Trash to treasure: How to change a throw-away butter jar to a fairy bed
Posted on: September 12, 2021
- In: Doll house
- 1 Comment
You may ask what this has to do with the blog title, namely paper, dolls, and toys? Well, it is a toy, and made for a doll to sleep in. It involves two kinds of paper: Card stock in the mattress and masking tape. Also, the end of this article explains how to make a fairy doll.
1) The basis of this project is a butter jar.
Cut it about 1 cm from the base, around most of the base. Except at the headboard part – cut a headboard shape at one end.


2) Optional: Paint the inside and outside of the rim and headboard brown. Brown will look more realistic than white when seen through holes where the tree bark does not 100% fit.
Using white wood glue, cover the rim outside and both sides of the headboard with thin strips of tree bark. (I used the back of Eucalyptus tree bark – this has lovely rich colours, interesting patterns and basically a smooth texture.)

3) Attach four large wood beads with strong glue as bed legs.

4) Make a paper pattern of the mattress shape – put a piece of thin paper into the bed base, and make fold marks where it touches the corner. Cut on the fold marks. Make sure the paper piece fit. If not, cut it at the relevant spots. When it fits into the base of the bed, cut away another 1-2 mm all the way round the shape. This is to give some room for the mattress material.
5) Use your pattern piece and cut a piece of card stock in that shape. Glue the card stock to a thin layer of sponge or quilt batting, then cut the sponge or batting to match the card stock shape. You now have an uncovered mattess.

6) a) Cut a piece of cloth to cover the mattress, somewhat bigger than the mattress. Cut into the sides, up to the mattress. b) Wrap it to cover the sponge side in one piece, and glue the tabs down on the card stock. c) Cut another piece of cloth, this one the size of the mattress. Cover the card stock side. The mattress is now ready to place on the bed frame.
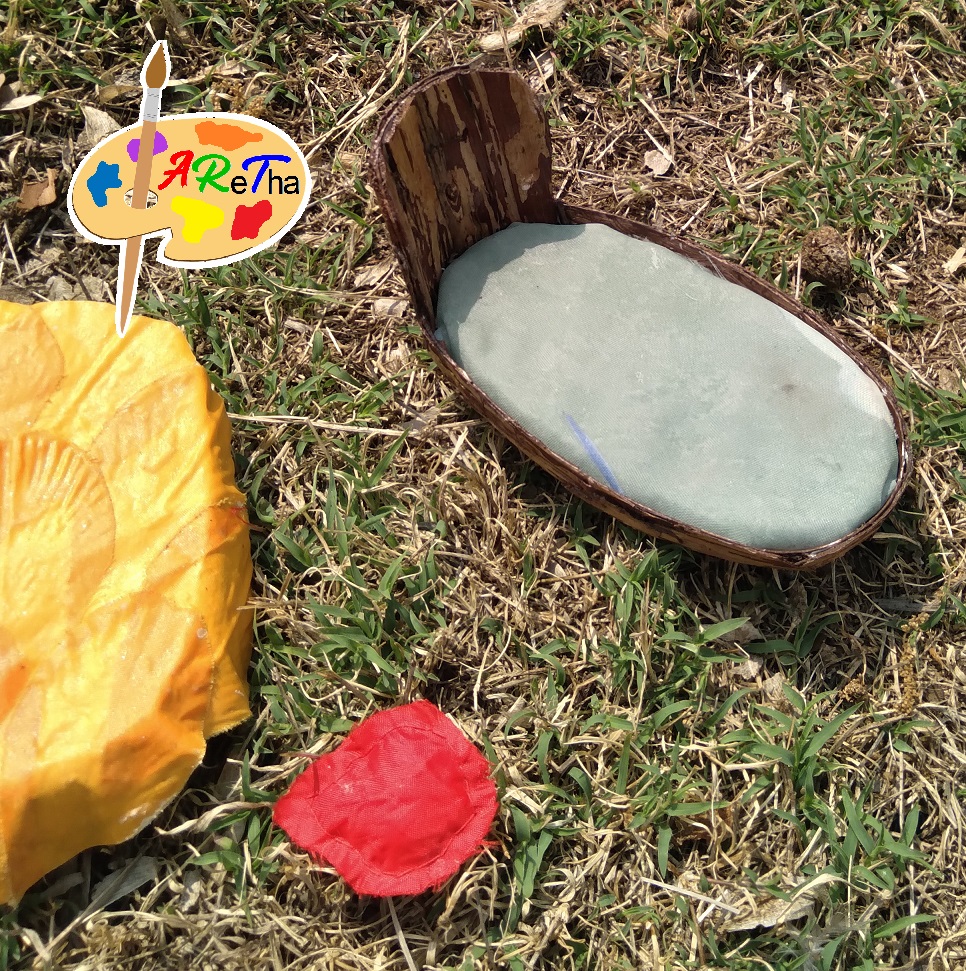
7) This petal bed cover was made by adding strips of masking tape to both sides of a foil bedspread shape to cover the foil. (Do not use non-stick foil. The masking tape needs to stick.) I then attached cloth flower petals to the masking tape with modge podge. The foil inside means the cover can be shaped into the position you want, while cloth alone do not shape well in miniatures. Of course, you can make a bedspread to your taste.
8) The pillow here is two cloth flower petals sewn together with a bit of stuffing, but you could sew a normal pillow if you prefer it.

Bonus)
Where did I get a fairy doll? It is easy to make one! I got a 10cm doll and a set of butterfly fridge magnets with plastic wings from Crazy Store. (A chain of cheap stores in South Africa.) I removed the magnet of the set of wings that best match the doll dress in colour, and stuck the wings to the doll. I decorated the wings with some stick-on “jewels”, and – I had a fairy doll!
- In: Doll house
- 2 Comments
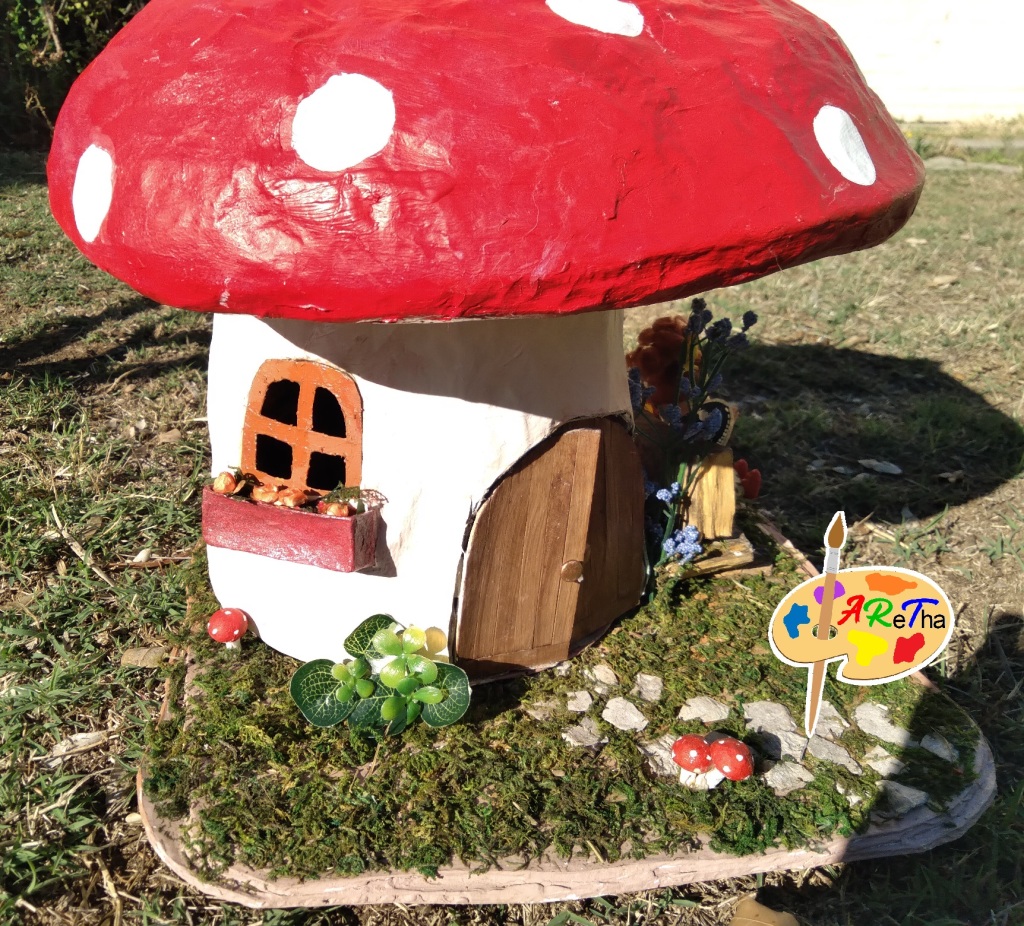
1a) Deep, deep into the woods, where no human has ever been, some fairies lived in giant mushrooms.
Well, that was more interesting than:
1b) In my house in Welkom, I put together a fairy dollhouse from foil, masking tape, and various odds and ends.
Decide for yourself if a) or b) is true, and which version you prefer.

2a) It was truly unexpected that a drone for Google Earth, trying to take photos of every place, happened to take this photo of their houses. So unexpected, in fact, that the Google people thought it was a hoax and threw out the photos.
2b) This is my finished dollhouse, seen from more than one angle. Some of the methods involved (foil + masking tape + paper mache) come from this video of Where the Gnomes Live. This project was done over a month, from about a week into August until today.
3a) You may think the Google Earth people were stupid, but there is one thing you did not consider: Fairies really do not want to be found. They have been know to use some plant-based potions to make people forget they ever saw them. Or photographed them.
Could this be what happened here? Well, inside the fairy home right next to the candle, on a shelf that rests on a branch, there is a book with the title Herb magic.
Or maybe humans are stupid. Maybe most of us will convince ourselves we see nothing special even when we do. Maybe, that is why the Google Earth people rejected the pictures they took in this area.

3b) I made the bed from a throw-away plastic bowl which I cut and covered in Eucalyptus bark, and the shelf from a piece of card covered in the same way. I added a bedspread and pillow from cloth flowers, a candle and the Herb Magic book. The stone floor is made with egg carton pieces for stones, but with a bit of glitter paint to look more magical.
4a) The fairies does very well without any human intervention. Because what more does a fairy need than some berries, a pan, a cup, a little fireplace, a broom and a magic wand? Even the mirror is a luxury – no fairy actually needs one.
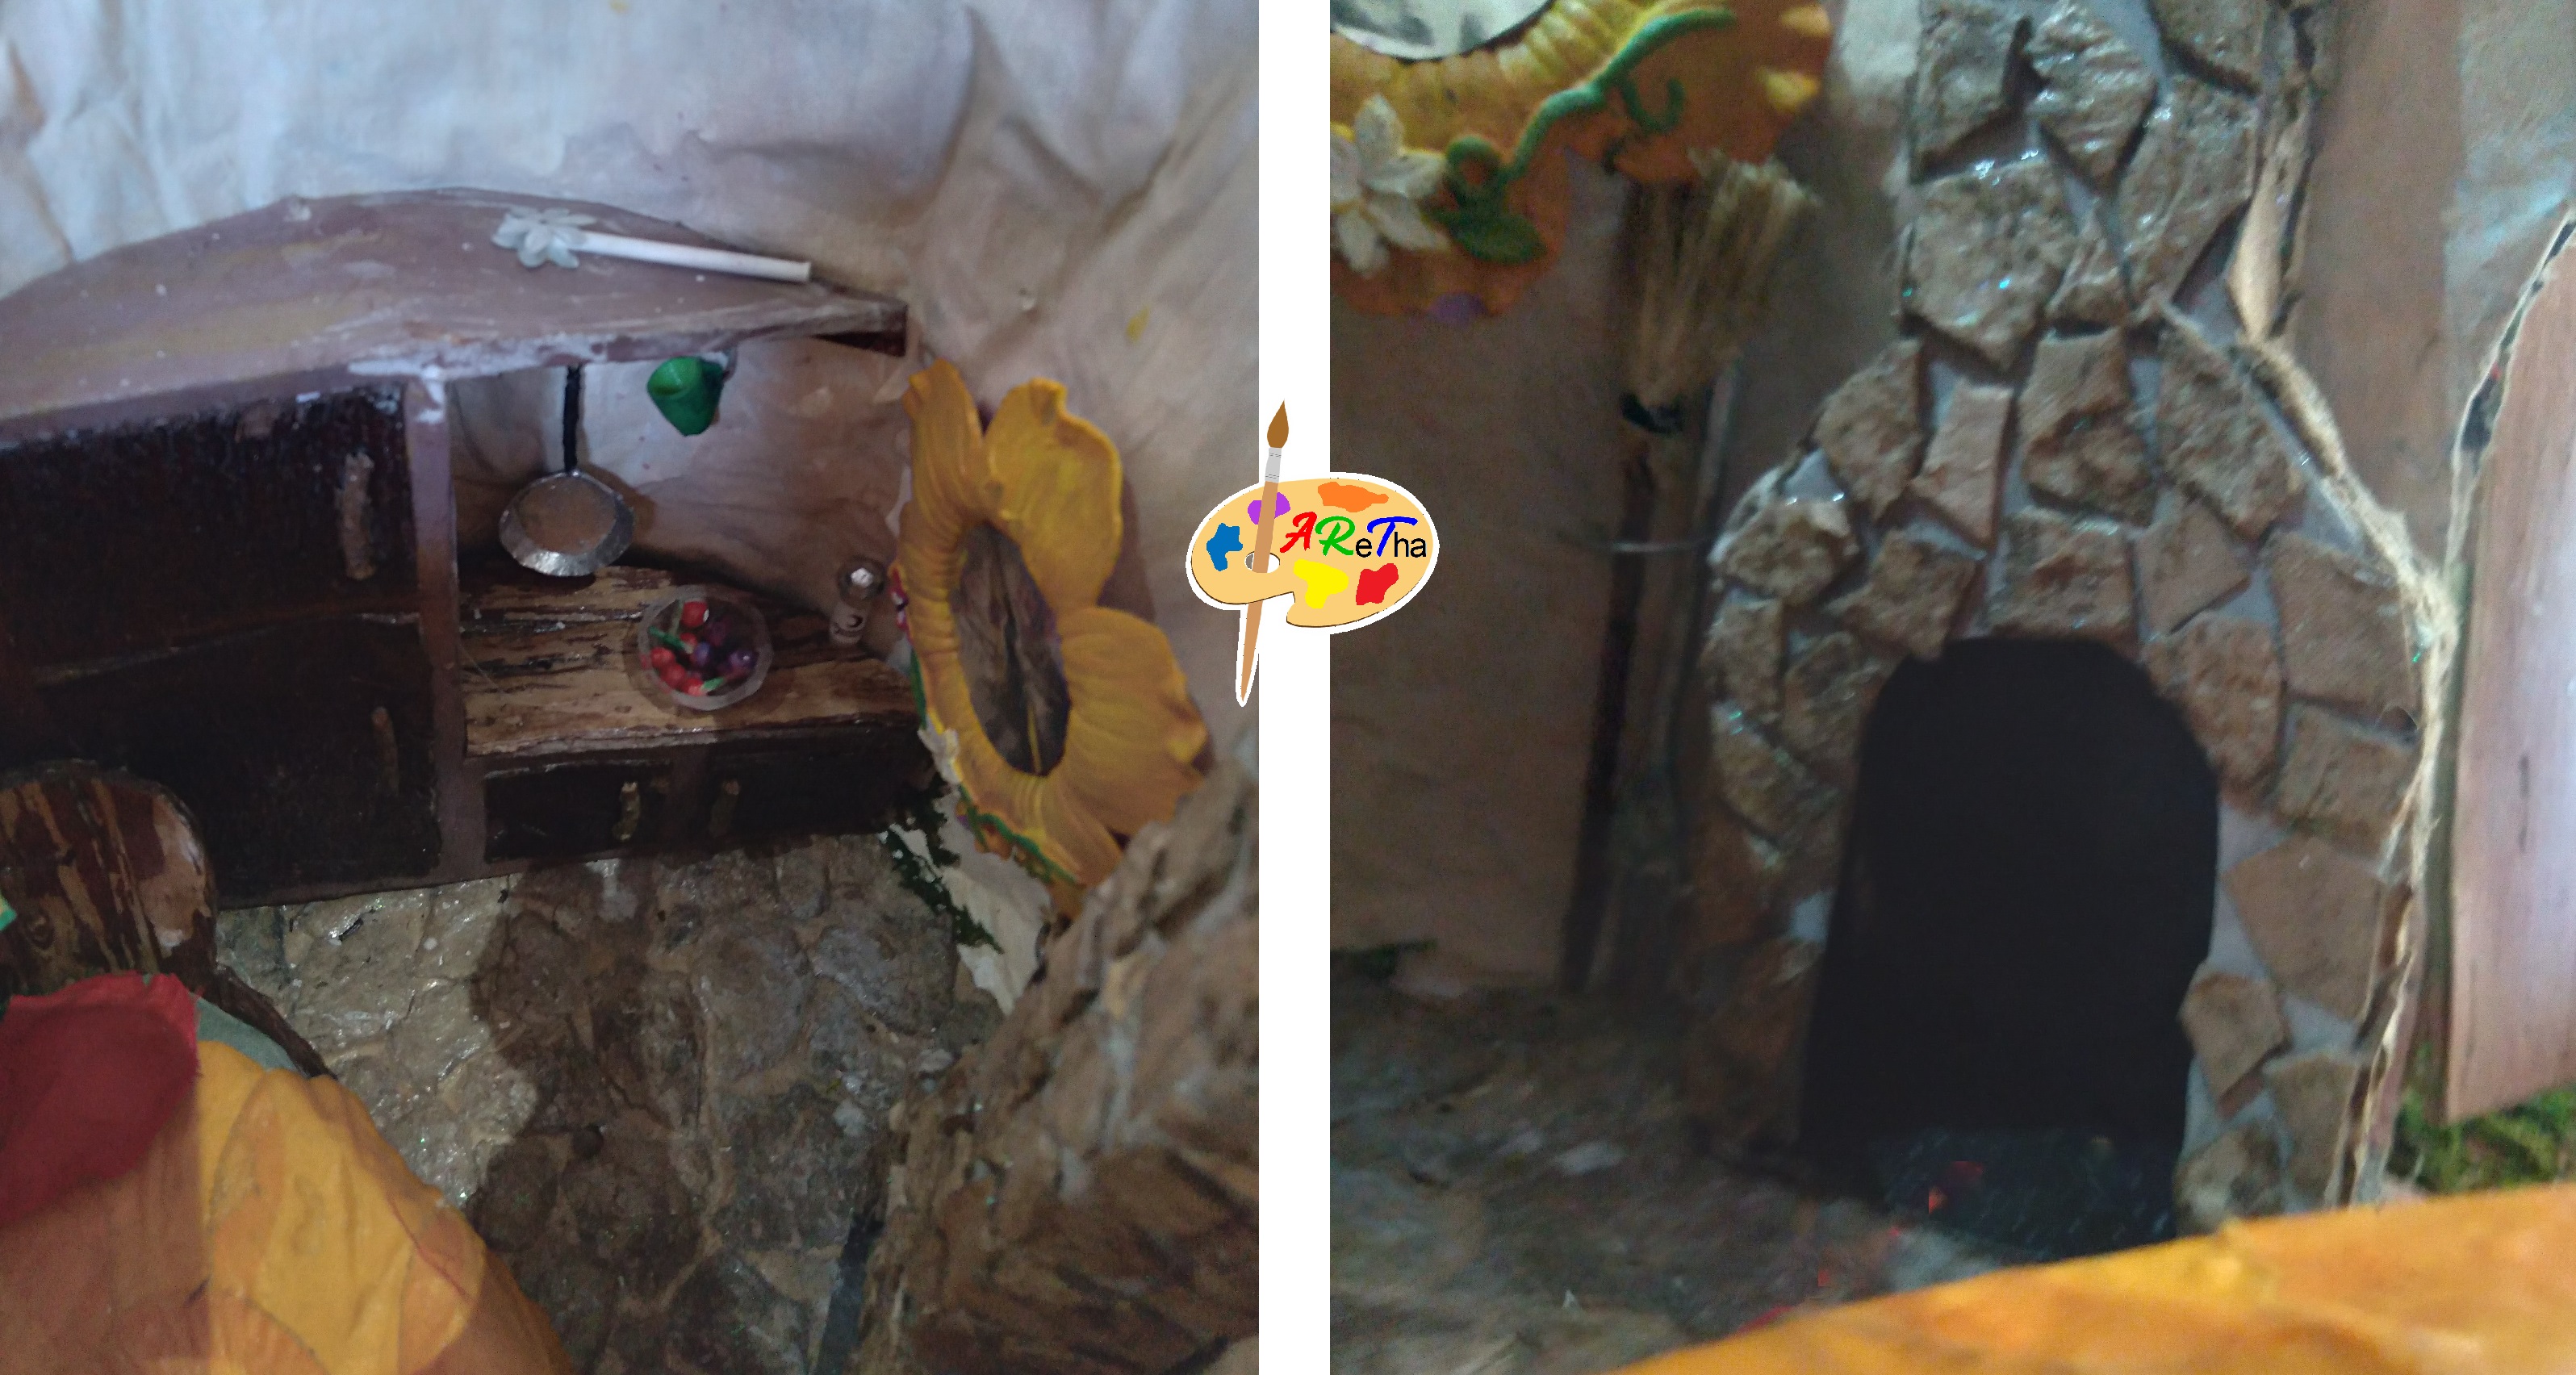
4b) The cupboard is decorated with tree bark, and has bead “berries” on the counter top. It also has a small vial labelled Moonbeam Essence. I made a pan from mostly foil and a small piece of wire, and put that and a 3D printed mug on hooks. There is also a tiny magic wand and a flower-frame mirror. The broom to the left of the fireplace is made from a little stick with grass on it.
5a and b) How do we know what story is true? Here is a clue: Humans will display dolls that look like fairies in boring gravity-safe spots where the dolls can stay for a long time, like the little seat to the right of the mushroom house. Actual fairies can fly, and would feel perfectly comfortable on places like the rounded roof.

- In: Doll house
- 5 Comments
Sometimes, people change. Sometimes, circumstances change. Nobody will be surprised to hear that I haven’t looked at many paper dolls lately. Which is why this blog had only one entry the past 2 years. (And even that is not really a paper doll, but inspired by one.)
I found myself with a lot of spare time lately. I tried to find a place I can volunteer, but there is very little an autistic woman without own transport can do in an era of social distancing. So, I watched too many Youtube videos. I ended up watching Ara Bentley from Bentley house minis. She makes the most amazing, detailed 12th scale dollhouse scenes.
“Okay”, I thought. “I can’t do what she does, but I can maybe start by making one small house scene. Just a façade from cardboard and paint. And little pieces of cloth for the curtains and transparent plastic for the windows. And a little bead flower pot and artificial flowers to decorate the house front, and a sticker house number. And what about another texture of cardboard (corrugated with the hills and valleys visible on one side) for the roof? And…”
This was fun! After that little façade, I got more ambitious: I tried a book nook and spent ages making mini books. The next attempt was a coffee shop. I started the beginning of July, and finished about a week into August. Here is the result: Boeretroos Koffiekroeg en Soet Gebak (Boeretroos is an Afrikaans expression for Coffee, and the rest means Coffee shop and Sweet baked goods). Everything, except where I state otherwise, was my work. Where this is wonky, you have nobody else to blame – only me.

Floor: Foamboard, covered in popsicle stick wood and coffee-stained. (One thing I will do different next time is to not get impatient. At first I put the foamboard and glued-down popsicle sticks under heavy books for the craft glue to dry. I found that if the piece is covered with a book, it takes ages to dry. I removed the books. With nothing to weigh it down, it curled up while drying.)
Walls: Foamboard and cardboard covered in a coffee-theme wallpaper (found on the Internet). The left wall has a plastic window with paper frame, the back wall a cardboard shelf and paper door.

Door to the (not actually made) kitchen: Paper painted with acrylic to look like wood, and cut to make a wood inlay picture of a coffee mug and teaspoon.
Ex-fireplace, changed to be shelves: cardboard, chipboard, wall crack filler. The coffee and tea tins on the shelves are pictures I found on the Internet and modified and duplicated to make many sides of the same tin, printed and assembled. The cake is made from cardboard layers, wall crack filler for icing, beads, and paint. The packs of rusks are made from matchsticks.
Shelf behind counter: The coffee packs are my own computer design, printed and assembled. The book and menu on the second shelf are also my own design. I printed my menu and book cover and assembled it. The coffee cups are 3D printed and not my design. The coffee maker and coffee pot are my own, made in cardboard and paper.
Counter: Made from cardboard and chipboard, with a plastic window. The food on the top shelf is a Peppermint Crisp tart (from clay in a bowl cut from a Strepsils blister pack, decorated with brown shards of paper for grated chocolate and tiny pieces of green foil for the Peppermint Crisp), cupcakes on a tray (sturdy card stock, foil and a toothpick for a tray, with clay and paper cupcakes), and a milk tart (made from clay in a beer bottle cap repurposed as a baking dish). On the bottom shelf, the food is a cherry pie (clay, shreds of red paper and transparent glue, also in a repurposed bottle cap), and a fridge tart (layers of card with a bead cherry and paper mint leaf on top).
Cash register: Made from cardstock, foamboard, a matchstick, and printed keyboard and display (pictures for printing found on Easy DIY Miniatures) and printed money.

Table and chairs: From wooden kebab skewers, cardboard, card stock, and plastic straws. A lace flower was stuch to the back of each chair, to see if it looks like carvings in the wood when covered. (Note to self: Rather use paper straws in future. Plastic straws are a nightmare to paint.) Cloth coverings on the seats.
Table setting: Cloth, self-designed and computer-printed menu, jug rolled from paper, sugar jar from a cut section of milkshake straw, and computer-designed and printed papers for sticks of sugar. Coffee mug 3D printed by someone else. Cake: Clay on a paper plate.
The Lego girl
Posted on: February 16, 2020
There is a free computer program named Stud.io in which you can design anything with Lego. If you want to, you can even order the bricks to make your design in real life.
Being a paper doll fan, I designed a Lego ‘paper’ doll. With flat (2 Lego plates deep) outfits, of course.


What should I name my Lego girl? Please comment and tell me.
Circus acrobat and horse
Posted on: April 14, 2019
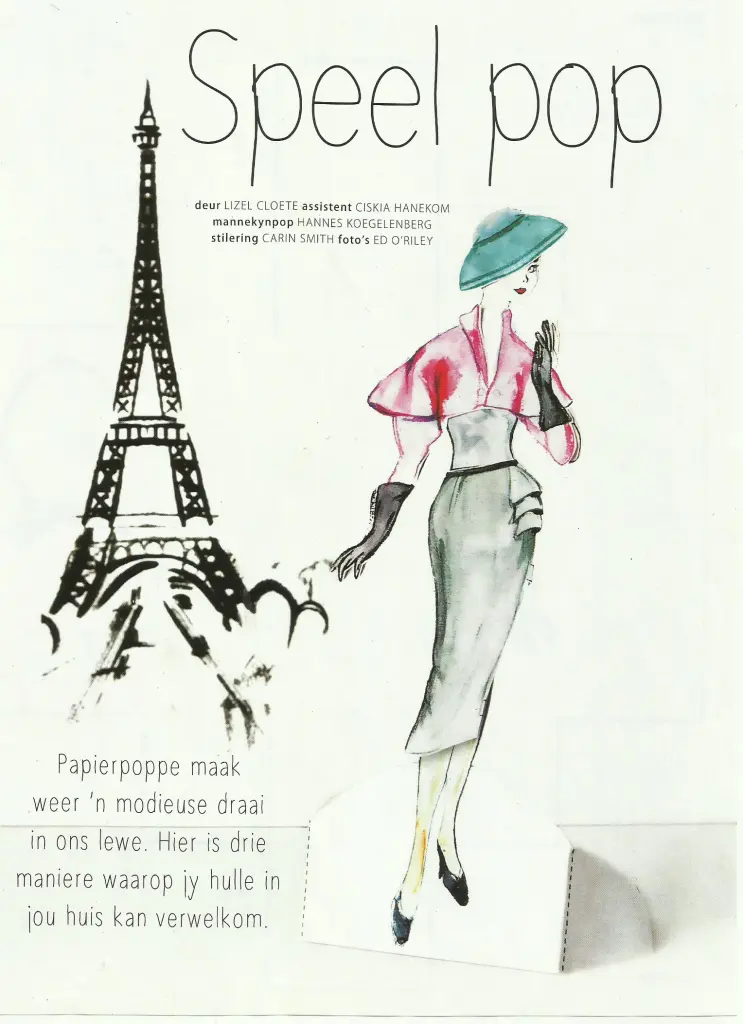
Parisienne Paper Doll
Posted on: April 7, 2019
- In: Paper doll
- 1 Comment
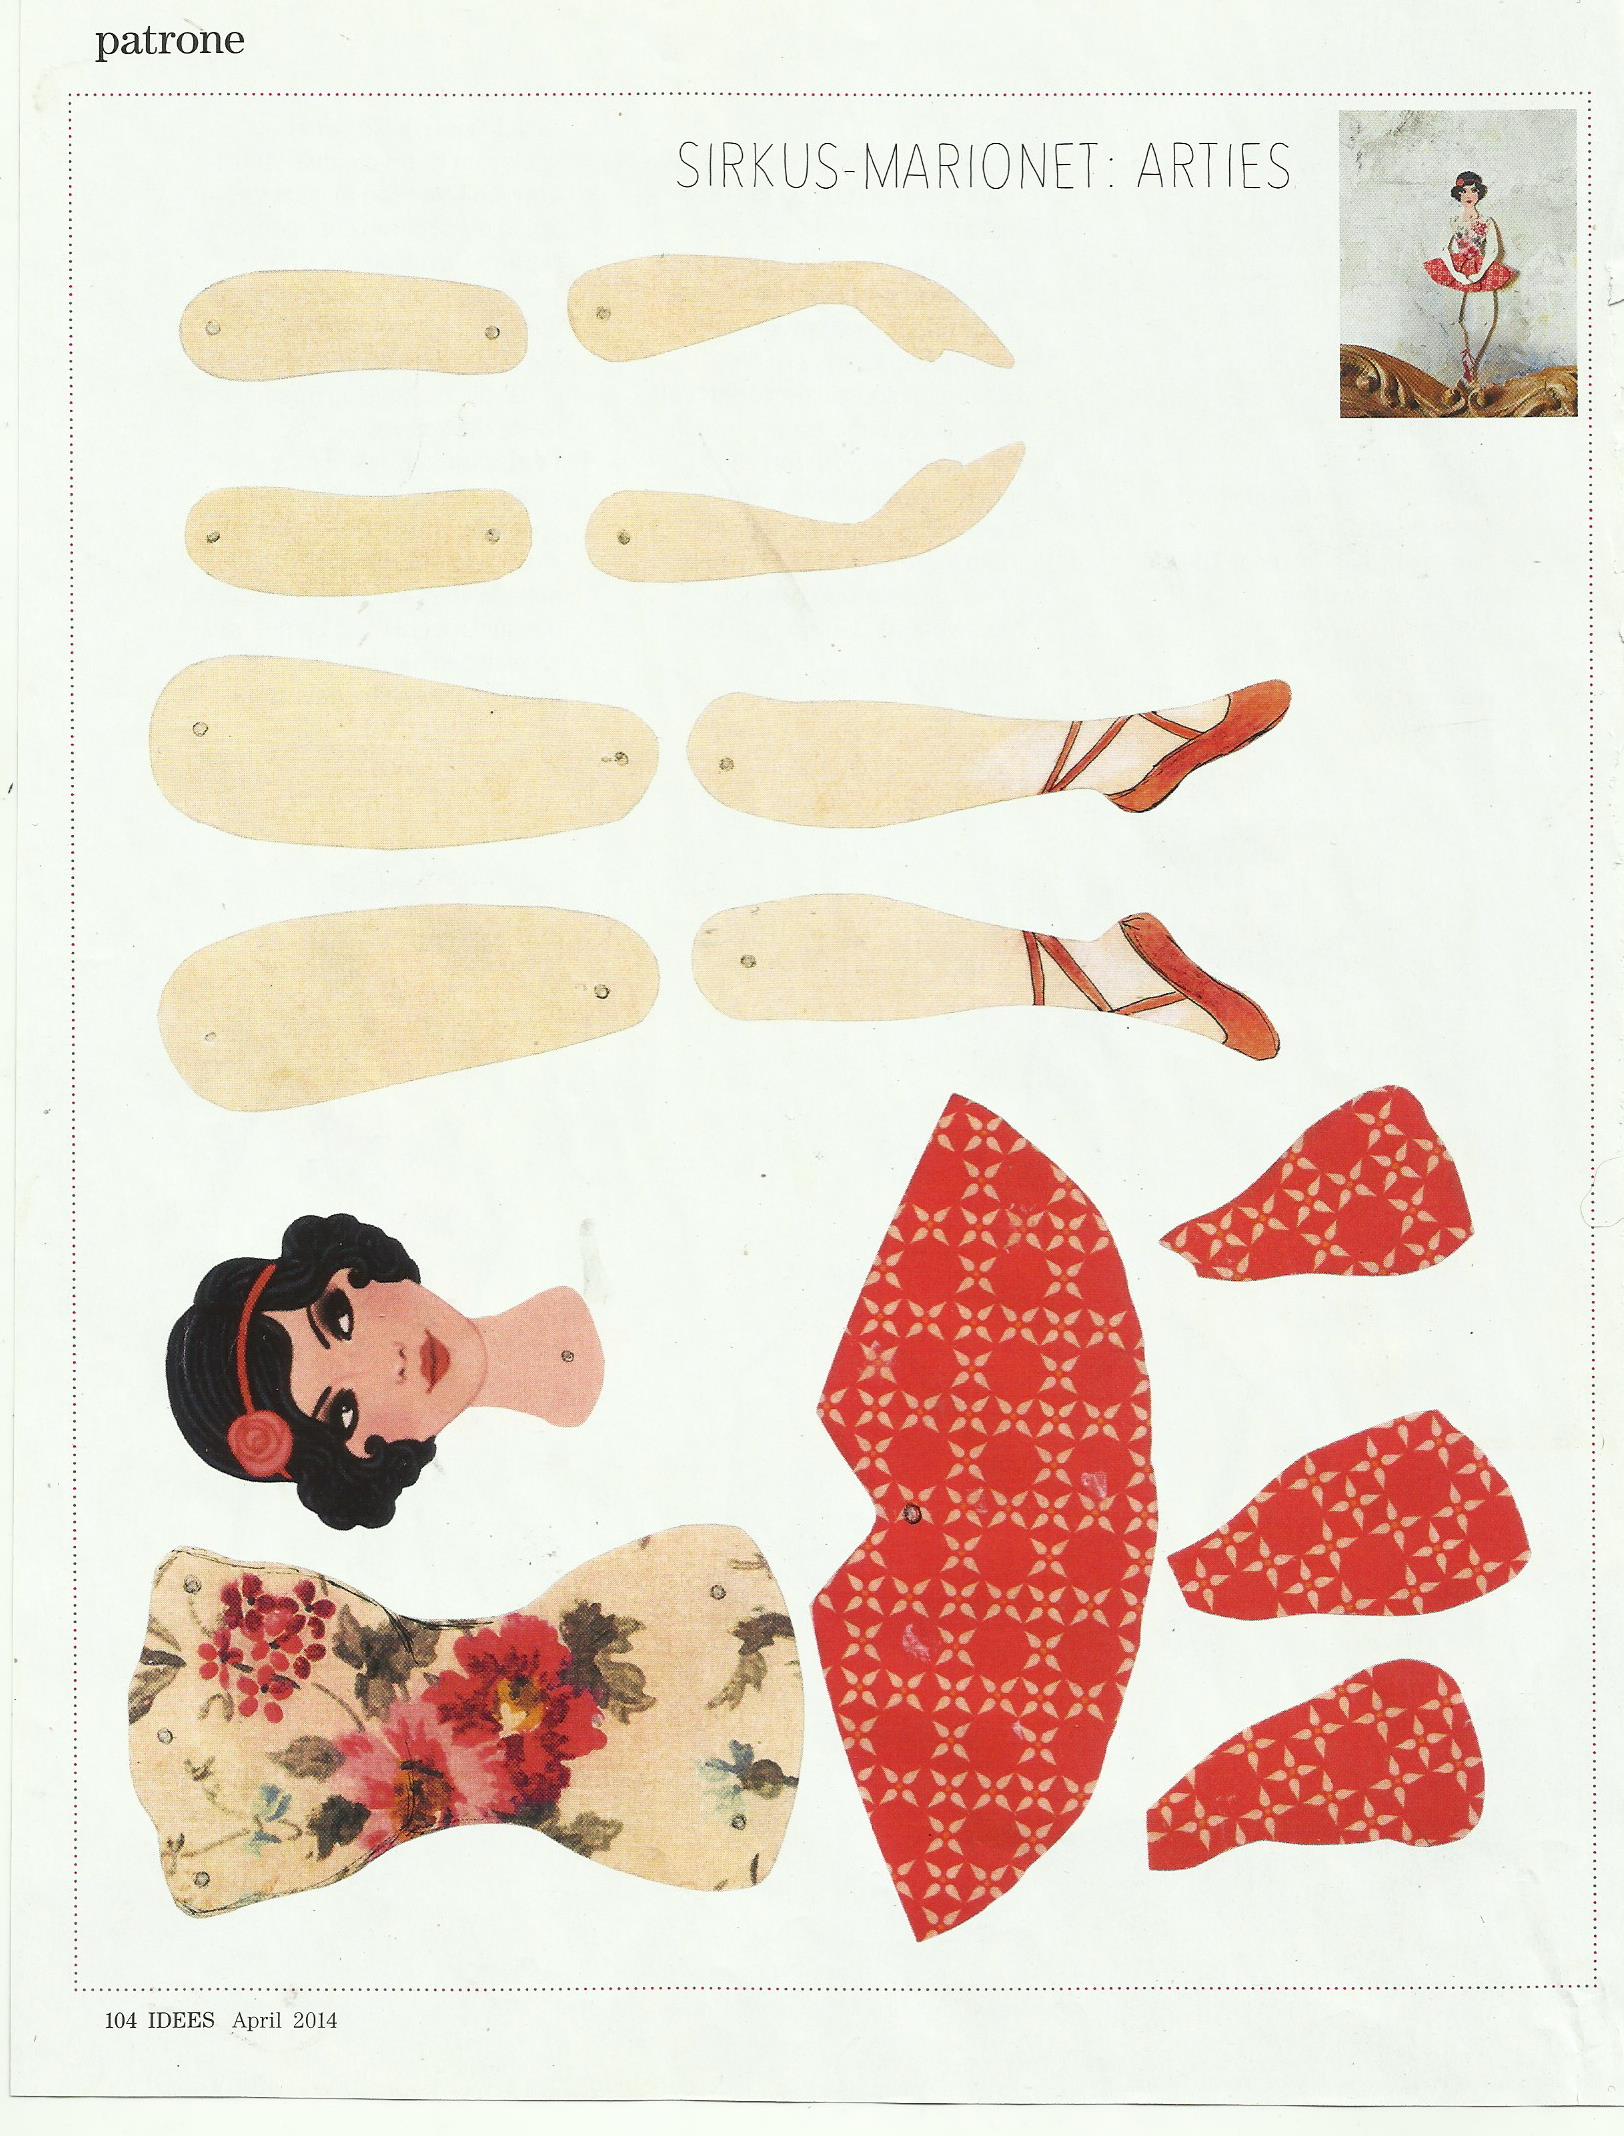
This doll is from the South African crafts magazine Idees, April 2014. The box is supposed to be photocopied at 245%, and the copy used.
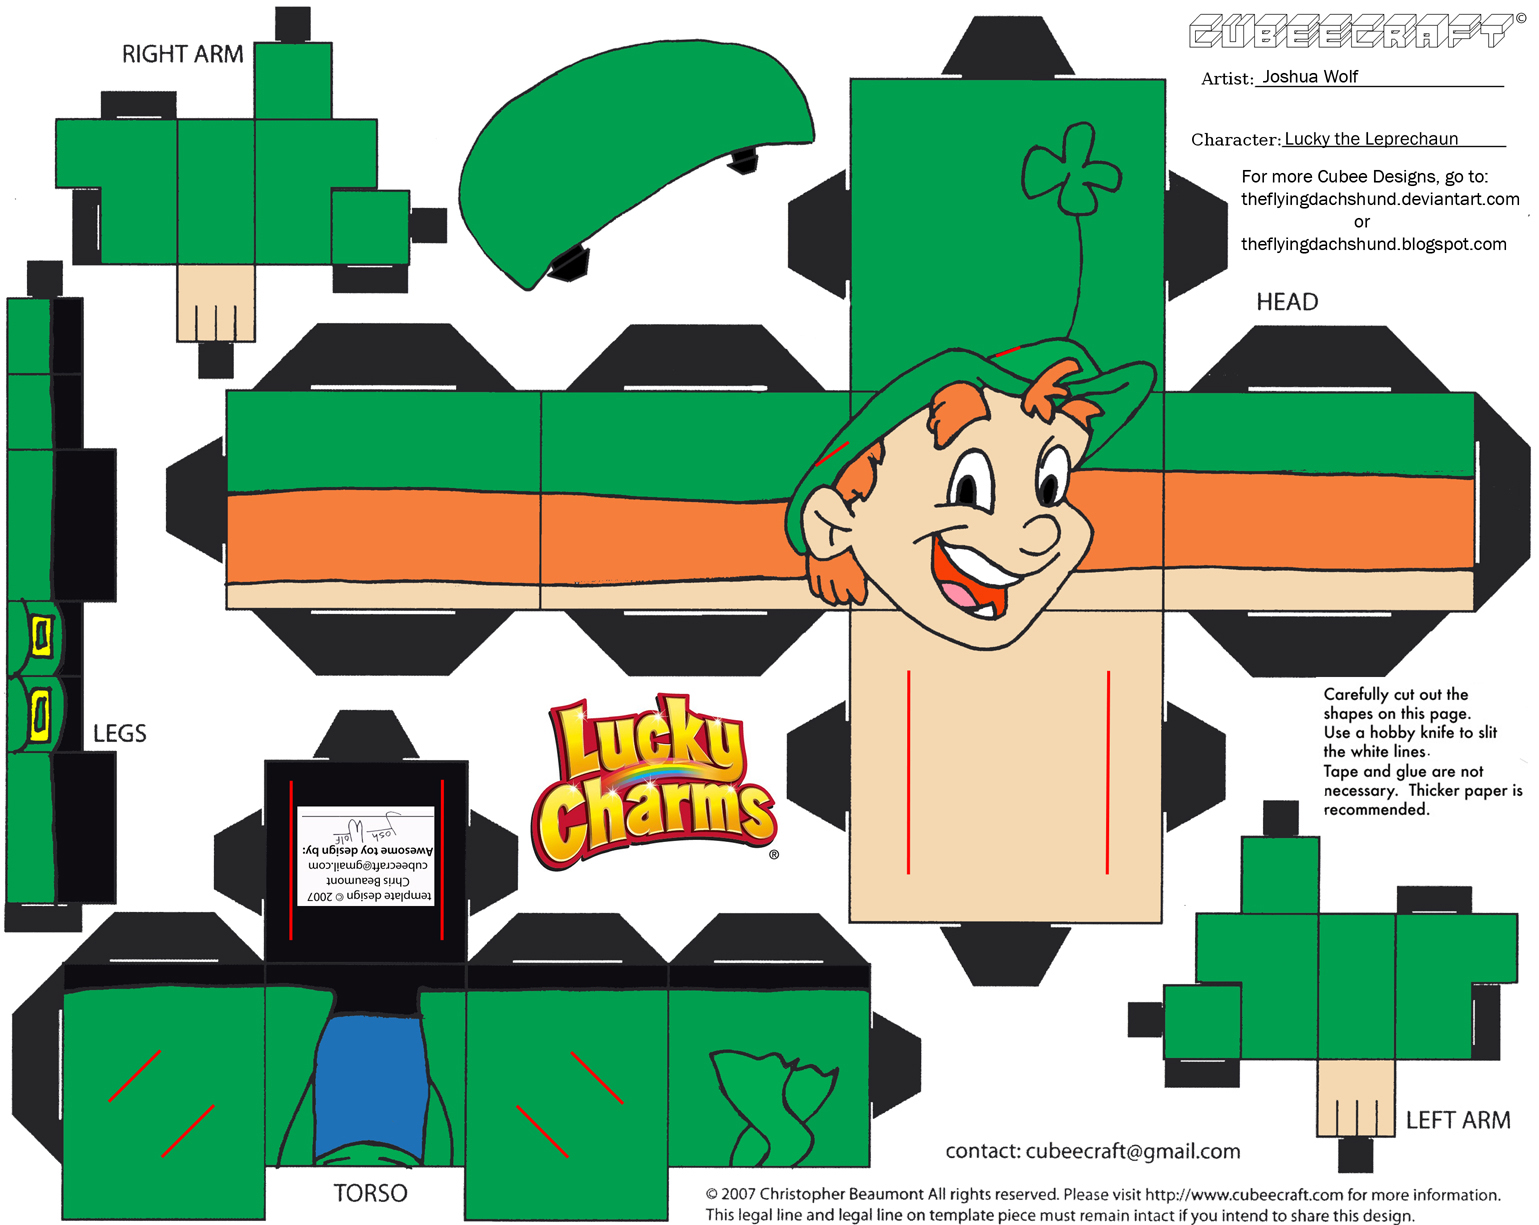
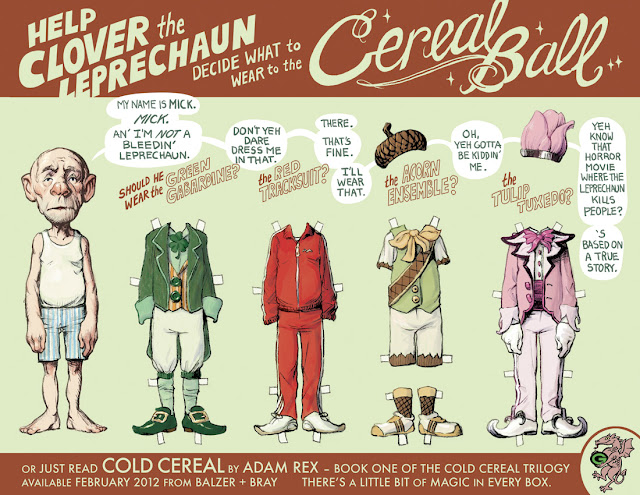
Leprechaun paper dolls
Posted on: March 17, 2018
From Papertem.com comes this box-shaped leprechaun toy:
From Education.com comes this paper doll:

This leprechaun is somewhat older:
… while this one is younger, again:

I am not even sure if this is a leprechaun, but it is a fun character:

This one is my personal favorite:

Unusual advertising paper toys
Posted on: February 21, 2018
The first one is for Schoeller yarns: 
The next for Dandee bread:
This one is from Burger King: Read the rest of this entry »
Celebrating rain!
Posted on: February 15, 2018
There is an area in South Africa, around Cape Town, which is so dry, they worry that the taps will run dry before the middle of the year. They got rain this week. I celebrate with a few dolls with raincoats or umbrellas.


More Vintage Valentines
Posted on: February 15, 2018
This one came with cut clothing in a small envelope. (I include two pics, one of the front and another of the inside.) As far as I know, these are more likely to be from the ’30s, and the wordplay ones mostly from the ’40s and ’50s.)


